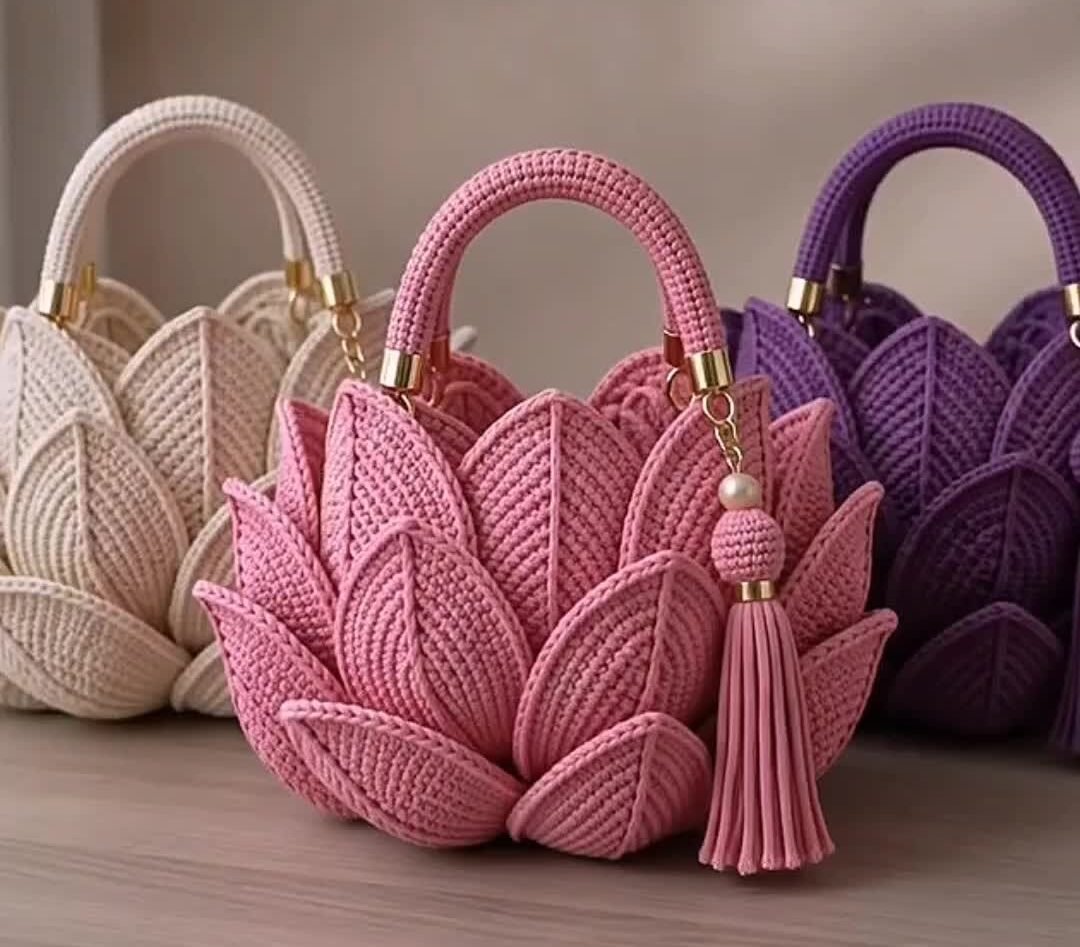
A crochet handbag shaped like a blooming flower is the kind of project that immediately catches the eye.
The bag in the photo combines layered crochet petals, a structured rounded handle, and a decorative tassel to create an elegant handmade accessory. The soft pink version is especially charming, but the same design looks beautiful in cream, purple, sage green, or even a two-tone combination.
At first glance, this bag looks complicated. In reality, the construction can be broken into several manageable pieces: a sturdy base, repeated leaf-shaped petals, a firm inner bag body, handles, and a few finishing details.
The exact stitch counts cannot be confirmed from the photograph alone, so the tutorial below is a practical method inspired by the visible design. You can easily adjust the dimensions to make a small handbag or a larger everyday tote.
What Makes This Bag Special?
The most striking feature is the three-dimensional flower shape.
Instead of crocheting one flat rectangle and sewing it together, individual pointed petals are arranged around the outside of a structured bag.
The petals overlap slightly, creating the look of a lotus or blooming flower.
The rounded handles add another polished detail.
Gold hardware and a long tassel make the finished bag look surprisingly luxurious, even though the main material is simply crochet cord.
It is a lovely project if you enjoy handmade accessories that look different from ordinary crochet totes.
Materials You Will Need
For a medium handbag similar to the one pictured, prepare approximately:
- 400–600 g cotton cord or polyester crochet cord
- 3–4 mm crochet hook, depending on your yarn
- Yarn needle
- Stitch markers
- Sharp scissors
- Two bag handles or materials for crocheted handles
- Optional metal handle connectors
- Magnetic snap or zipper
- Fabric for lining
- Sewing needle and thread
- Optional gold hardware
- Optional tassel
- Optional bag feet
- Measuring tape
A firm cotton or polyester cord works better than very soft yarn.
The petals need enough structure to keep their pointed shape.
Choosing the Best Yarn
For this style of handbag, ordinary fluffy knitting yarn is usually not the best choice.
You want something with definition.
Braided cotton cord, macramé cord, or polyester bag yarn will produce cleaner stitches and more structured petals.
A cord around 2–3 mm thick is a good starting point.
If you want a softer bag, choose cotton.
If you prefer a more rigid and durable handbag, polyester cord is often easier to shape.
The hook should be slightly smaller than you might normally use with the yarn.
Tight stitches help the bag hold its form.
Decide the Size First
Before making dozens of petals, decide how large you want the finished bag.
A practical medium size might be approximately:
- 25–28 cm wide
- 20–23 cm high
- 8–10 cm deep
A smaller evening bag could be closer to 20 cm wide.
If you plan to carry a phone, wallet, cosmetics, and keys, make the inner body large enough before adding the decorative petals.
The petals make the bag look bigger, but they do not create much extra storage space.
Crochet the Inner Bag Body
Begin with the structural part of the handbag.
A simple oval or rectangular-bottom bag works well.
Crochet a chain slightly shorter than your desired bag width.
Work single crochet around both sides of the foundation chain to create an oval base.
Increase around the ends until the bottom reaches the desired depth.
Once the base is large enough, stop increasing.
Continue working evenly around the bag.
Single crochet is ideal because it creates dense, sturdy fabric.
Continue until the body reaches approximately 18–20 cm high.
Do not worry if this section looks plain.
Most of it will eventually disappear behind the petals.
How to Crochet the Petals
The petals are the main decorative feature.
Each one should look like a long pointed leaf.
A simple method is to crochet around a foundation chain.
For a medium petal, start with a chain approximately 10–14 cm long.
Work stitches of increasing height as you travel toward the center.
For example, you can move gradually from:
- Slip stitch
- Single crochet
- Half double crochet
- Double crochet
- Half double crochet
- Single crochet
- Slip stitch
Then work along the opposite side of the foundation chain.
This naturally creates an elongated oval.
To make the pointed tip more pronounced, work several stitches around the final chain before continuing down the opposite side.
Creating the Raised Center Line
One beautiful detail visible in the inspiration photo is the raised line running through the center of each petal.
You can create this effect using surface crochet.
After completing the petal, use slip stitches along the center.
Another option is to crochet through the back loops on selected rows so the center forms a natural ridge.
That little detail makes a surprising difference.
Without it, the pieces look like simple leaves.
With it, they begin looking much more dimensional and sculpted.
Make Different Petal Sizes
The flower effect looks better when the petals are not all identical.
Create three approximate sizes.
Large petals
Use these around the upper and back sections.
They create height and structure.
Medium petals
These form the main body of the flower.
They should make up the largest group.
Small petals
Place these near the front and lower edge.
They help the flower taper naturally toward the base.
For a medium bag, you may need roughly 20–30 petals depending on their size and how closely you overlap them.
Lay everything out before attaching them permanently.
Arrange the First Layer
Start attaching petals around the lower portion of the bag.
Point the tips upward.
Position them close together with slight overlap.
Sew or crochet the bottom section of each petal firmly onto the bag body.
Do not attach the entire petal flat.
Leaving the upper portion free creates the three-dimensional flower effect.
Continue around the bag.
Try to keep the spacing fairly even.
The arrangement does not have to be perfectly symmetrical.
Flowers are not manufactured with rulers either.
Add the Second Layer
Place the next row slightly higher.
Position each petal between two petals from the lower row.
This staggered arrangement hides gaps and creates fullness.
Continue working upward.
The upper petals can be longer and more upright.
At this stage, the handbag starts changing from a plain crochet pouch into the sculptural flower shape seen in the photo.
Take time to view the bag from several angles.
If one area looks empty, add another petal before moving on.
Shape the Front
The front of the bag deserves extra attention.
Place several prominent petals in the center.
Allow smaller petals to fan outward near the bottom.
The goal is to create natural layers rather than perfectly straight rows.
A few slightly angled petals give the design movement.
You can pin the pieces temporarily before sewing them.
This is much easier than removing ten carefully stitched petals because the flower suddenly looks lopsided.
Crochet the Handles
The inspiration bag uses rounded, firm handles covered in matching crochet.
You can buy ready-made circular or U-shaped bag handles and crochet around them.
Alternatively, create your own using flexible plastic tubing or strong rope as the inner core.
Work single crochet tightly around the core until completely covered.
Attach metal caps or connectors if available.
The handle should feel firm when lifted.
A beautiful bag loses some of its charm when the handle stretches halfway to your knees.
Attach the Handles
Position one handle on each side of the bag opening.
Make sure both sides are level.
Use reinforced crochet tabs or strong sewn attachment points.
Test the handles before finishing the lining.
Place a few moderately heavy objects inside the bag and lift it gently.
If anything stretches or feels loose, strengthen the attachment now.
Add a Closure
A magnetic snap is probably the easiest option.
Attach it near the top center before installing the lining.
A zipper provides more security but takes slightly more work.
Another pretty option is a small crochet flap with a decorative button.
Choose a closure that does not compete visually with the petals.
The flower design should remain the star.
Make the Lining
A fabric lining gives this handbag a professional finish.
Place the finished crochet body on folded fabric.
Trace the approximate shape while adding seam allowance.
Cut two pieces.
Sew the sides and bottom together.
You can also add a small interior pocket before sewing the lining into the bag.
Insert the lining.
Fold the upper raw edge inward and hand-stitch it neatly around the inside opening.
A lining prevents keys, pens, and other small objects from pushing through crochet stitches.
Add the Tassel
The long tassel visible in the photo is a lovely finishing touch.
You can use a ready-made tassel or make one from matching cord.
Attach it to one handle with a metal clasp.
Adding a crochet bead above the tassel makes it coordinate beautifully with the rest of the bag.
Gold-tone hardware works especially well with pink, cream, or purple.
Silver hardware would look lovely with blue, gray, or black.
Color Ideas
The design gives you plenty of room to experiment.
Try:
- Dusty pink with gold hardware
- Cream with champagne-colored accents
- Deep purple with gold
- Sage green with brass
- Black with silver hardware
- Burgundy with antique gold
- Baby blue with pearl details
You can also make the inner petals slightly lighter than the outer petals.
That gives the flower more visual depth.
Keeping the Bag in Shape
Structured crochet bags benefit from gentle shaping.
If your petals curl too much, lightly shape them by hand.
Depending on the yarn, gentle steam may help, but never place a hot iron directly onto synthetic cord.
Some polyester yarn can melt.
Test heat on a scrap piece first.
Stuff the finished bag with clean tissue or fabric while storing it.
This helps maintain the shape of both the bag and the flower petals.
Cleaning and Care
Hand washing is usually safest for a bag with hardware and structured petals.
Use cool or lukewarm water and mild detergent.
Avoid twisting or aggressively scrubbing the bag.
Rinse gently.
Press excess water out with a towel.
Reshape the petals while damp.
Allow the handbag to dry naturally on a flat surface.
Do not place it in a tumble dryer unless the yarn manufacturer specifically says that is safe.
Frequently Asked Questions
Is this crochet bag suitable for beginners?
A confident beginner can make it, but it is easier if you already know chains, single crochet, half double crochet, double crochet, and slip stitches.
How many petals do I need?
Usually around 20–30 for a medium handbag, depending on their size and spacing.
Can I make the bag without lining?
Yes, but lining improves the shape and prevents small items from poking through the stitches.
What yarn works best?
Firm cotton cord, polyester cord, or crochet bag yarn works especially well.
Can I use normal acrylic yarn?
You can, but the petals may be softer and less structured.
Can I make it larger?
Yes.
Increase the base and body first, then make additional petals to cover the larger surface.
Do the petals need to be identical?
No.
Using different sizes actually helps create the natural layered flower appearance.
Final Thoughts
This crochet flower handbag is much more than a simple tote.
The overlapping petals transform an ordinary crochet body into a sculptural accessory that looks elegant, feminine, and completely handmade.
The secret is not a complicated stitch.
It is the layering.
Build a strong inner bag, crochet plenty of pointed petals, arrange them gradually, add a firm handle, and finish everything with a lining and decorative tassel.
Whether you choose soft pink, elegant cream, or dramatic purple, this lotus-inspired crochet bag is the kind of project people notice immediately—and then ask the inevitable question: