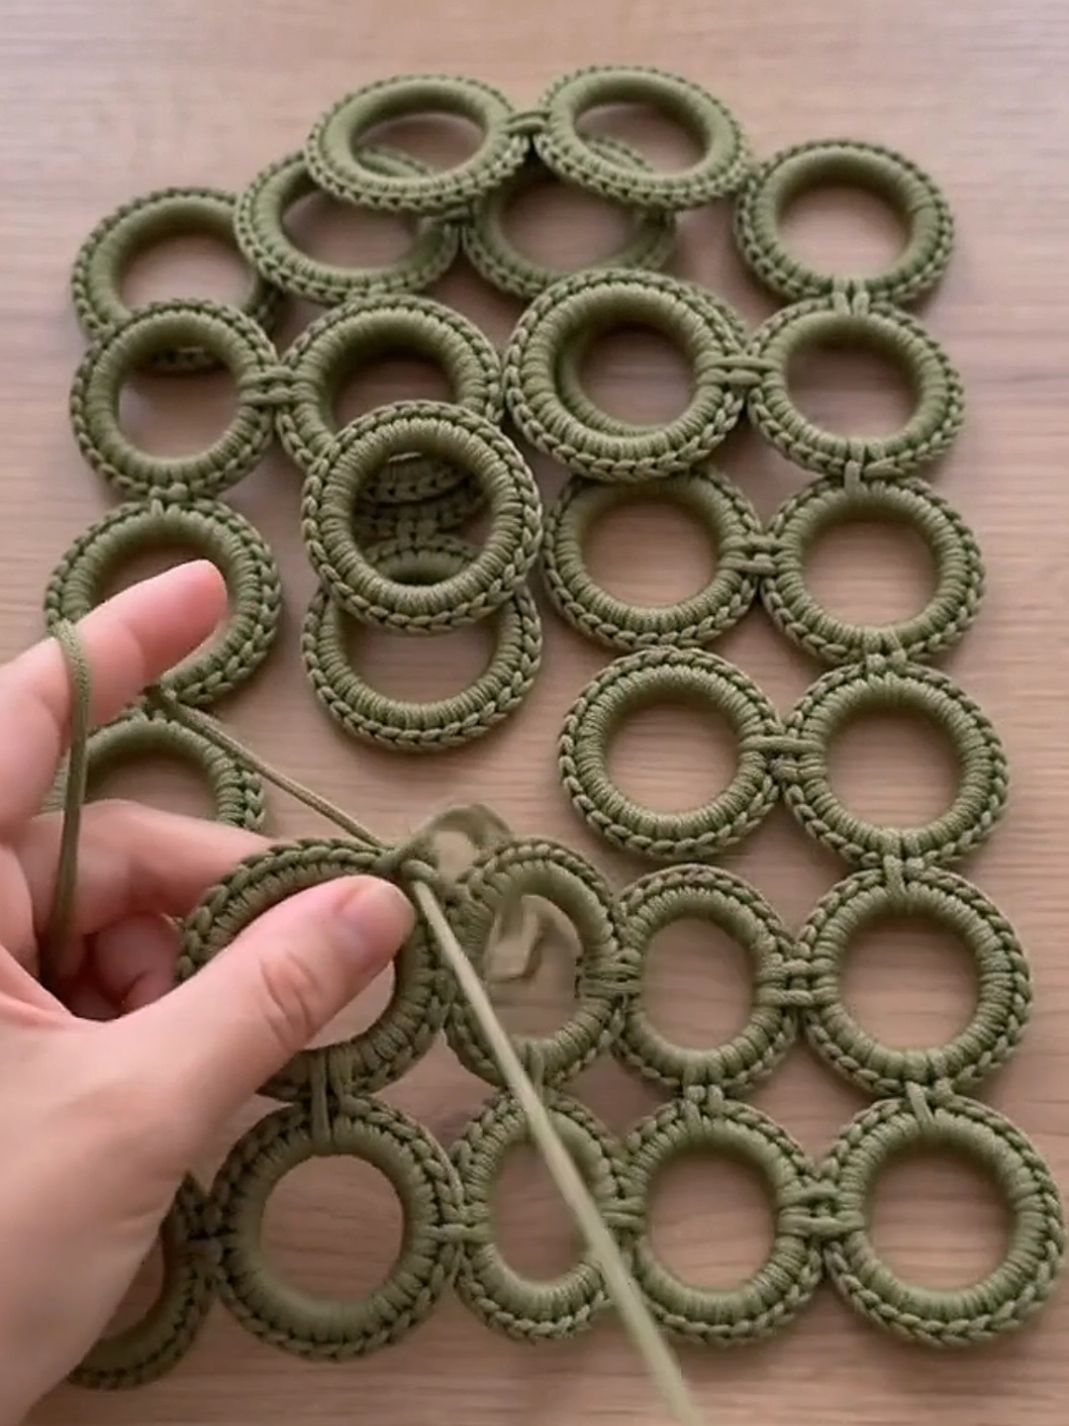
Crochet does not always have to begin with a long foundation chain or a traditional granny square.
The technique in the photo uses small circular rings wrapped and crocheted with yarn, then joined together to create a flexible openwork panel. Once enough rings are connected, the panel can become the body of a handbag, tote, decorative basket, table mat, or even a stylish wall decoration.
The olive-green color in the photo gives the pattern a modern, natural look, but this design works beautifully in cream, black, terracotta, dusty pink, beige, navy, or any color that matches your style.
At first, all those little circles may look like a complicated puzzle.
The good news? You only need to learn how to cover one ring. After that, it is mostly repetition, joining, and resisting the temptation to start another color before finishing the first one.
What Is This Crochet Technique?
The design is built from solid rings that are completely covered with yarn.
Each ring has a neat crocheted border around the outside.
The finished rings are then connected at several points to form rows.
When rows are joined together, the circles naturally create small decorative spaces between them.
This makes the fabric lighter than a solid crochet panel while still giving it plenty of structure.
For a handbag, this method is especially attractive because the rings produce a strong geometric texture that looks handmade without appearing overly traditional.
Materials You Will Need
For a medium crochet ring bag, prepare:
- 25–40 plastic or wooden rings
- Cotton cord, macramé cord, or firm crochet yarn
- Crochet hook appropriate for your yarn
- Yarn needle
- Sharp scissors
- Stitch markers
- Fabric for lining
- Sewing needle and thread
- Magnetic snap or zipper
- Two handles, optional
- Bag strap, optional
- Metal rings or clips for attaching a strap
The exact number of rings depends entirely on the size of the bag.
For a small shoulder bag, around 24–30 rings may be enough.
A larger tote may require 40 or more.
Choosing the Rings
The circles are the foundation of the whole design, so choose rings that are strong and similar in size.
Plastic craft rings are lightweight and inexpensive.
Wooden rings create a slightly firmer result.
Curtain rings may also work if they are smooth and do not contain sharp metal pieces.
A useful diameter is around 4–6 cm.
Larger rings create a more open, dramatic pattern.
Smaller rings create a tighter panel with less space between motifs.
Whatever size you choose, use the same size throughout the main panel unless you deliberately want a mixed geometric design.
Choosing the Best Yarn
Firm yarn works best.
Cotton cord is an excellent choice because it creates clear stitches and holds its shape well.
Macramé yarn also works beautifully.
Polyester crochet cord gives the bag additional durability and tends to resist stretching.
Avoid extremely fuzzy yarn.
The beauty of this pattern comes from seeing each ring clearly, and fluffy yarn can hide the definition.
The olive shade in the photo is especially elegant for autumn or neutral wardrobes.
For something softer, try cream or beige.
For a more dramatic accessory, deep burgundy, black, forest green, or purple would look stunning.
How to Cover the First Ring
Start with one ring.
Make a slip knot and place the yarn on your hook.
Insert your hook through the center of the ring.
Pull the working yarn through.
Begin working single crochet stitches around the ring.
Instead of inserting your hook into previous crochet stitches, you are crocheting directly around the physical ring.
Continue adding single crochet stitches.
Push the stitches together as you work so no plastic or wood remains visible.
The number of stitches will depend on the ring diameter and yarn thickness.
Do not focus too much on an exact number.
The goal is simply to cover the ring completely without making the stitches so crowded that they buckle.
Finishing the Ring
Once the entire ring is covered, join the final stitch to the first stitch with a slip stitch.
Cut the yarn, leaving a tail long enough to weave in securely.
Use your yarn needle to hide the tail inside the surrounding stitches.
You now have your first completed crochet ring.
It may feel strangely satisfying.
Unfortunately, this is also the moment when you look at the pile of 29 remaining rings and realize your evening plans have changed.
Adding a Decorative Outer Round
The rings in the photo appear to have a neat textured border.
To recreate that look, add a second crochet round.
Insert your hook into the first stitch of the covered ring.
Join the yarn.
Work one single crochet into each stitch around.
Depending on the look you want, you can also use:
- Slip stitches for a very tight edge
- Single crochet for a clean structured edge
- Crab stitch for a decorative rope-like finish
Crab stitch, also called reverse single crochet, produces a particularly beautiful border around circular motifs.
Try it on one sample ring first.
Make All the Rings First
There are two ways to approach this project.
You can crochet and join rings one at a time.
Or you can prepare all the individual rings first.
For beginners, making all the rings first is usually easier.
It allows you to compare their size and tension.
Lay them on a table once finished.
If one ring is noticeably thicker than the others, you can adjust it before assembly.
Consistency makes the finished panel look much more polished.
Arrange the Rings
Before permanently joining anything, arrange the rings flat on a table.
For a rectangular bag panel, you might use:
- 4 rings across
- 6 rings high
That gives you 24 rings per panel.
You can also create a narrower design using three rings across.
The photo shows rings positioned closely together with small joining points between them.
Place your rings exactly where you want them before attaching them.
Taking a quick photo of the arrangement can help you remember the layout if everything gets moved.
And somehow, everything always gets moved.
How to Join Two Rings
Place two covered rings side by side.
Thread your yarn through a stitch on the first ring.
Pull it through a corresponding stitch on the second ring.
You can connect them using several tight slip stitches.
Another option is to sew them together with a yarn needle.
The connection should be strong but relatively small.
You want the rings to remain visibly separate.
In the inspiration image, the joins appear to consist of a short band of stitches between neighboring rings.
This creates structure without hiding the circular shapes.
Joining a Full Row
Connect the first and second rings.
Then join the second ring to the third.
Continue until the first row is complete.
Make another row separately.
Once both rows are finished, place one row beneath the other.
Join the rings vertically.
Check the alignment after every few joins.
If one row begins drifting sideways, correct it early.
A tiny alignment problem in the first row can become surprisingly dramatic after six rows.
Building the Bag Panels
For a structured handbag, make two identical rectangular panels.
For example:
4 rings wide × 6 rings high
would require 24 rings for the front and another 24 for the back.
For a smaller purse:
3 rings wide × 5 rings high
may be enough.
Once you have two complete panels, place them side by side and compare them.
They should be approximately the same width and height.
Making the Sides and Bottom
There are several ways to build the sides.
The easiest method is to crochet a solid strip.
Make a foundation chain equal to the desired bag depth.
Work rows of single crochet until the strip is long enough to travel:
down one side, across the bottom, and up the opposite side.
Sew or crochet this strip between the front and back ring panels.
This gives the bag structure while preserving the circular design on the front and back.
Another option is to continue using rings around the sides.
That creates a more open and decorative bag.
However, a solid side strip is usually easier for an everyday handbag.
Add a Strong Top Border
The upper edge needs reinforcement.
Attach yarn near the top corner.
Work single crochet evenly across the tops of all rings.
Depending on the gaps between rings, you may need to work several chain stitches between them.
Continue for two or three rounds.
This creates a solid band where you can attach the handles, zipper, or strap.
Keep the tension firm.
The top border carries much of the bag’s weight.
Handle Options
A short handbag handle looks elegant with this design.
You can use:
- Wooden handles
- Acrylic handles
- Leather handles
- Metal handles
- Crochet handles
For a crochet handle, make a long chain.
Work tight single crochet rows until the strap reaches the desired width.
For more strength, place cotton cord or sturdy rope inside and crochet around it.
Attach the handles securely through the reinforced top edge.
Adding a Shoulder Strap
A long crossbody strap makes the bag more practical.
You can crochet one directly onto the bag or use removable metal clips.
For a removable strap, attach a metal D-ring to each side of the top edge.
Clip the strap onto these rings.
This also allows you to switch between a short handbag handle and a long shoulder strap.
Why a Lining Is Important
Because the design contains large circular openings, a lining is highly recommended.
Without one, your keys might stay inside.
Your lip balm may not be so cooperative.
Choose a cotton fabric that coordinates with the yarn.
Place the completed bag over the folded fabric.
Trace the approximate shape.
Add seam allowance.
Cut two pieces.
Sew the sides and bottom.
Insert the lining inside the crochet bag.
Fold the upper fabric edge inward and hand-sew it neatly around the inside border.
Add an Interior Pocket
Before installing the lining, consider adding a small pocket.
Cut a rectangle of fabric.
Fold and finish the raw edges.
Sew it onto one lining piece.
This gives you a useful place for:
- Phone
- Keys
- Cards
- Lip balm
- Small cosmetics
A beautiful handmade bag becomes much more useful when you are not digging around for your keys for five minutes.
Closure Ideas
A magnetic snap is the easiest closure.
Install it in the lining near the upper center.
A zipper offers better security.
You can sew the zipper between the lining and crochet border.
A handmade crochet button loop also works well for a more relaxed design.
Choose something that matches the overall style.
Creative Variations
Once you understand the technique, there are many possibilities.
Try alternating two colors.
Make every other ring cream and olive green.
Create a rainbow version using leftover yarn.
Use larger rings in the center and smaller rings around the edges.
You can also turn the same ring panel into:
- Table runners
- Placemats
- Decorative baskets
- Cushion covers
- Wall hangings
- Bottle holders
It is one of those techniques that begins as “I’ll make one bag” and somehow ends with matching home décor.
Frequently Asked Questions
Can beginners make this?
Yes.
You mainly need to know slip knots, single crochet, slip stitch, and basic joining.
What type of ring should I use?
Plastic, wooden, or smooth craft rings work well.
Can I use metal rings?
Yes, but they make the finished bag considerably heavier.
How many rings are needed?
A small bag may need around 25–35 rings. Larger designs may require 40–60 or more.
Does the bag need lining?
It is strongly recommended because of the open spaces inside the rings.
What yarn works best?
Firm cotton or polyester crochet cord gives the cleanest shape.
Can I wash the finished bag?
Usually gentle hand washing is best, especially if it includes lining, metal hardware, or wooden rings.
Final Thoughts
A crochet ring bag is a wonderful example of how a very simple idea can create an unusual finished design.
Each individual ring takes only a short time to cover.
The magic appears when all those circles are connected.
Start with one ring, repeat the same technique, arrange the motifs carefully, and join them into a structured panel.
Add a strong border, lining, and comfortable handles, and suddenly those little circles become a modern handmade bag.
The repetitive work also makes this a relaxing project for evenings when you want something creative without constantly counting complicated stitch patterns.
And once you finish the first bag, save those extra rings.
You will almost certainly think of another project for them.