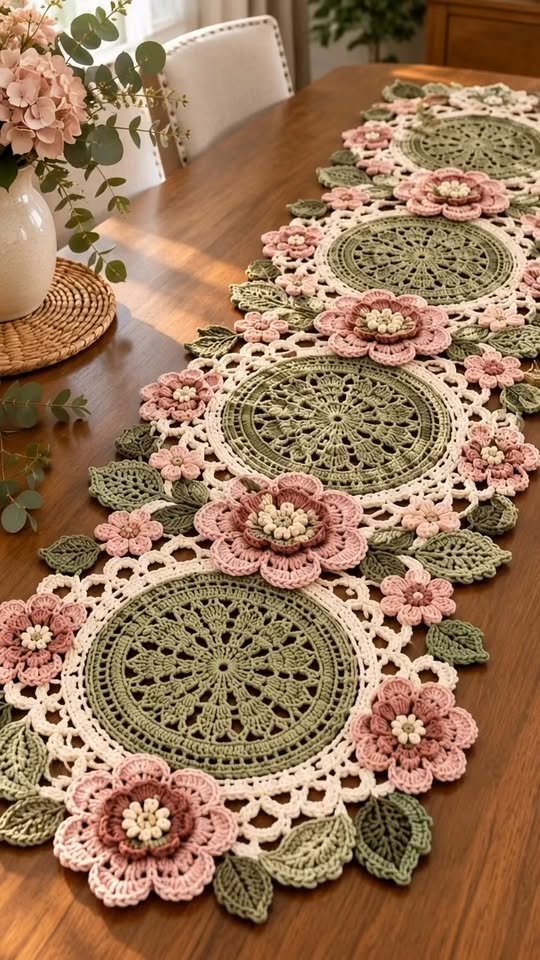
A handmade crochet table runner can completely change the look of a dining table, and the design in this photo is especially beautiful.
It combines large round lace-style motifs with layered pink flowers, sage-green leaves, and a soft cream connecting border. The result feels romantic, vintage, elegant, and a little botanical without looking too heavy.
The runner is made from repeated crochet pieces rather than one long rectangular panel. That makes the project easier to manage because you can work on one motif at a time and join everything together later.
The exact stitch count cannot be confirmed from the photo alone, so the tutorial below is an inspired method that recreates the same overall look while allowing you to adjust the size to your own table.
What Makes This Runner Special?
The centerpiece of the design is a row of large circular crochet medallions.
Each circle has a detailed lace pattern in a muted sage-green color.
Around those circles, cream crochet sections create an open decorative frame.
Then come the flowers.
Large layered dusty-pink blossoms are placed between the medallions, while smaller flowers fill the spaces along the sides.
Green crochet leaves soften the edges and make the entire runner look like a long floral arrangement.
It is almost like putting a garden down the center of your table—except this one never needs watering.
Materials You Will Need
For a medium-length table runner, prepare approximately:
- 600–900 g cotton crochet yarn
- Sage-green yarn
- Dusty-pink yarn
- Cream or ivory yarn
- Small amount of beige or light cream for flower centers
- Crochet hook suitable for your yarn
- Yarn needle
- Scissors
- Stitch markers
- Measuring tape
- Blocking pins
- Blocking mat or thick towels
A cotton yarn between DK and worsted weight works well.
If you want a delicate lace runner, use thinner cotton thread with a smaller hook.
For a heavier, more modern runner, use thicker cotton cord.
Choosing the Colors
The colors in the photo work beautifully together because none of them are too bright.
The main palette includes:
- Sage green
- Dusty rose
- Soft cream
- Warm beige
This combination gives the runner a calm, elegant look.
You can also try:
- Cream, lavender, and olive green
- White, burgundy, and forest green
- Beige, terracotta, and sage
- Ivory, blush pink, and eucalyptus green
- White, pale blue, and gray-green
For a more dramatic version, use black as the background with burgundy flowers and deep green leaves.
Decide the Length First
Before making the first motif, measure your table.
A table runner usually looks good when it extends slightly beyond each end of the table.
For example, if your table is 150 cm long, a runner around 170–190 cm can create a nice drape.
If you prefer the runner to stay completely on top of the table, make it slightly shorter than the tabletop.
The photo appears to show several large round medallions joined in a straight line.
A practical layout might use:
- 4 large circles for a smaller table
- 5 large circles for a medium table
- 6 or 7 circles for a long dining table
Make one complete circle first and measure it before deciding how many you need.
Crochet the Large Center Medallion
The large green circles give the runner most of its structure.
Begin with a magic ring.
Work a small circle of double crochet or treble crochet stitches into the center.
For the next rounds, alternate solid sections with chain spaces.
This creates the lace appearance visible in the photo.
A basic progression can look like this:
Round 1: Work double crochet stitches into a magic ring.
Round 2: Increase evenly around the circle.
Round 3: Alternate double crochet clusters with chain spaces.
Round 4: Work into the chain spaces to create small arches.
Round 5: Add longer chain loops and decorative groups.
Continue expanding the circle evenly.
The important thing is to keep the medallion flat.
If the circle begins to cup upward, you need more increases.
If it starts becoming wavy, you may have too many.
Creating the Lace Effect
The medallions in the photo have a very open, decorative center.
You can recreate this by using combinations such as:
- Chain-3 spaces
- Double crochet clusters
- Shell stitches
- V-stitches
- Picots
- Treble crochet
- Small fans
Do not make every round solid.
Alternating dense and open rounds creates the beautiful lace-like appearance.
For example, one round can be mostly double crochet.
The next can contain chain spaces.
The following round can use shells.
This also makes the project more interesting because you are not repeating the same stitch endlessly.
Add a Firm Outer Edge
Once the medallion reaches the size you want, add one or two stronger rounds.
Single crochet works well.
You can also use half double crochet.
This stronger border makes it easier to connect the cream lace sections later.
Block the finished medallion before making the rest.
That way you know its true size.
Make the Cream Frame
The photo shows a cream-colored crochet layer surrounding each green circle.
This frame is airy rather than solid.
Attach the cream yarn to the outer round of the green medallion.
Work around using alternating groups of stitches and chain spaces.
For example:
Work 3 double crochets.
Chain 3.
Skip a few stitches.
Repeat.
On the next round, work into those chain spaces.
You can create scallops, arches, or small fans.
Keep the cream section fairly open.
The goal is to frame the green center without covering it.
Joining the Large Motifs
Once several green-and-cream circles are complete, arrange them in a straight line.
Leave a small space between each circle.
The spaces will eventually be filled with flowers and connecting crochet.
You can join the motifs in several ways.
The easiest method is sewing them together at a few points using matching cream yarn.
Another option is joining them with slip stitches.
If you are comfortable with join-as-you-go crochet, you can connect them while completing the final cream round.
For a runner like the one in the photo, slightly separated circles usually look better than tightly joined circles.
Crochet the Large Flowers
The large dusty-pink flowers are probably the most eye-catching detail.
Each flower can be made in layers.
Start with a magic ring.
Work a small center.
Then create the first petal round.
For example:
Make 6 petals around the center.
Each petal can be built with:
- Single crochet
- Half double crochet
- Double crochet
- Half double crochet
- Single crochet
This naturally creates a rounded petal.
For the second layer, work behind the first petals.
Create chain loops.
Then crochet larger petals into those loops.
The second layer should extend beyond the first.
For an even fuller flower, add a third layer.
Make the Flower Centers
The centers in the image look textured and raised.
You can recreate this effect with small cream-colored bobbles.
Try working several puff stitches or popcorn stitches into the center.
Another option is to make tiny crocheted knots and sew them together.
This creates the appearance of small flower stamens.
Use cream or pale beige.
The contrast looks especially beautiful against dusty pink.
Small Flowers for the Sides
Do not make every flower large.
The smaller flowers help fill gaps and keep the design balanced.
A simple five-petal flower is enough.
Start with a magic ring.
Create five small petals.
Add a light-colored center.
Make several of these.
Place them between the large flowers and along the outer edges of the runner.
Different flower sizes make the runner look more natural.
Crochet the Leaves
The sage-green leaves are another important part of the design.
Make a foundation chain approximately 8–12 stitches long, depending on the leaf size.
Work along one side of the chain using increasing stitch heights.
For example:
- Slip stitch
- Single crochet
- Half double crochet
- Double crochet
- Double crochet
- Half double crochet
- Single crochet
Work several stitches into the final chain to create the pointed tip.
Then work back along the opposite side.
Slip stitch to finish.
Add a Leaf Vein
The leaves in the photo have visible texture.
You can create a central vein using surface slip stitches.
After finishing the leaf, crochet or embroider a line from the base toward the tip.
This small detail makes the leaf look much more realistic.
For added variation, make some leaves slightly longer and others shorter.
Arrange Everything Before Sewing
This part matters more than people expect.
Lay all the medallions, flowers, and leaves on a large table or floor.
Arrange the big circles in one straight line.
Place the large flowers between the circles.
Add smaller flowers around them.
Then position the leaves along the outside edges.
Do not sew anything yet.
Take a photo of the arrangement.
Walk away for a few minutes.
Come back and look again.
Sometimes one empty area becomes obvious only after you stop staring at it for twenty minutes.
Attach the Flowers and Leaves
Once you are happy with the arrangement, sew the flowers onto the cream connecting sections.
Use yarn that matches the flower or background.
Stitch through the back of each flower so the stitches remain hidden.
Attach leaves at the base and along a small section of the middle.
Do not sew every part completely flat.
Leaving some of the flower petals and leaf tips free gives the runner more dimension.
That three-dimensional look is one of the prettiest features of the design.
Fill Empty Spaces
If there are open gaps between medallions, crochet small chains or lace bridges to connect them.
You can also add:
- Tiny flowers
- Small leaves
- Picot chains
- Crochet vines
Avoid filling every single space.
The open areas are part of what makes lace crochet attractive.
Too many decorations can make the runner look crowded.
Create the Outer Border
Once everything is joined, add a final cream border along both sides.
You can use a simple combination of:
Single crochet, chain 3, skip, single crochet.
Or create small scallops.
A delicate picot border also looks beautiful.
The border should unify the separate motifs and give the runner a finished shape.
Do not make it too heavy.
The flowers and medallions already provide plenty of detail.
Blocking the Runner
Blocking is essential for this project.
The runner may look slightly uneven immediately after assembly.
That is normal.
Gently wash or dampen the finished piece according to the yarn instructions.
Press out excess water with a towel.
Do not twist.
Place the runner flat on a blocking mat or clean towels.
Stretch the medallions into round shapes.
Arrange the flowers.
Straighten the edges.
Pin everything into place.
Allow it to dry completely.
Blocking can make a handmade project go from “almost finished” to “where did you buy that?”
How to Style It
This runner works beautifully on a wooden table like the one in the photo.
The warm wood creates a lovely contrast with the soft crochet colors.
Keep the rest of the table simple.
Try:
- A ceramic vase
- Eucalyptus branches
- Dried flowers
- Candles
- Simple white dishes
- Neutral napkins
Because the crochet runner already contains plenty of detail, you do not need many additional decorations.
Washing and Care
Hand washing is usually safest.
Use cool or lukewarm water.
Add a small amount of mild detergent.
Gently move the runner through the water.
Do not scrub or twist the flowers.
Rinse thoroughly.
Press between towels to remove excess moisture.
Reshape while damp.
Dry flat.
Avoid hanging it while wet because the weight can stretch the lace.
Frequently Asked Questions
Is this project good for beginners?
It is better for confident beginners or intermediate crocheters.
The basic stitches are not especially difficult, but assembling many motifs takes patience.
How many large circles do I need?
Usually 4–7 depending on the table length and motif size.
What yarn works best?
Cotton yarn gives excellent stitch definition and is easy to block.
Can I make it in one color?
Absolutely.
An all-cream version would look elegant and more traditional.
Do I need the flowers?
No.
You could create a simpler runner using only the circular medallions and leaves.
Can I make matching placemats?
Yes.
One large medallion surrounded by a cream border can become a beautiful round placemat.
Can I shorten the runner?
Simply reduce the number of large circular motifs.
The modular construction makes resizing easy.
Final Thoughts
This floral crochet table runner looks complicated because it contains so many beautiful details, but the project becomes much easier when you build it piece by piece.
Start with the large circular medallions.
Add cream lace borders.
Crochet the pink flowers separately.
Make plenty of green leaves.
Then arrange everything like a floral composition before joining it together.
The combination of sage green, dusty pink, and soft cream gives the finished runner a timeless handmade look that works beautifully in both traditional and modern homes.
It takes patience, especially when you reach flower number twelve and start wondering why you did not choose a plain tablecloth.
But once the finished runner is stretched across the table, all those little motifs suddenly make sense.